Disable periodic RAID check on Ubuntu 20.04 (systemd)

In the old days to disable periodic RAID checks, which can degrade performance, you would get rid of /etc/cron.d/mdadm . With systemd creep, these days you need to

for svc in mdcheck_start.timer mdcheck_continue.timer; do systemctl stop ${svc}; systemctl disable ${svc}; done

This works on Ubuntu 20.04. Probably also on other systemd managed systems.

MikroTik SwOS DHCP client not receiving a DHCP IP address

crs-317-1g-16s+

Trying to configure a Mikrotik Routerboard, I found that when booting SwOS, DHCP does not work. That is, the Routerboard, in my case a Cloud Router Switch CRS 317-1G-16S+, would send out DHCP requests but not get an IP address.

Turns out this is because the DHCP client of SwOS 2.7 is picky, and the dnsmasq DHCP server sent an offer that was not accepted by SwOS.

Using udhcpd as a dhcp server instead, the switch accepted the IP address just fine. I could then update the firmware; from 2.8 on, the SwOS DHCP client is more tolerant of DHCP offers. One of the changes in the SwOS 2.8 release notes says ‘make DHCP client work with RFC non compliant DHCP servers’. At any rate, 2.9 was happy with dnsmasq DHCP offers.

Log in to older APC PDUs with a modern OpenSSH

If you find yourself needing to SSH into an older APC PDU such as the AP7921 (or basically any appliance without up to date SSH service) and you use a modern OpenSSH, you may see

Unable to negotiate with target-host port 22: no matching key exchange method found. Their offer: diffie-hellman-group1-sha1

or

Unable to negotiate with target-host port 22: no matching cipher found. Their offer: blowfish-cbc

Since version 7, OpenSSH has disabled these by default because of known weaknesses, see www.openssh.com/txt/release-7.0. To talk to these obsolete SSH services, speak the following Ancient Options under a full moon:

ssh -oKexAlgorithms=+diffie-hellman-group1-sha1 -oCiphers=+blowfish-cbc my-user@target-host

.. and the doors to Moria may open.

Edit feb-2019: Recent Ubuntu versions have dropped support for legacy ciphers. You might see this error:

command-line line 0: Bad SSH2 cipher spec '+blowfish-cbc'.

In that case it may be best to install package “openssh-client-ssh1″ and use the “ssh1″ binary instead.

CentOS, RedHat, Fedora: check_yum? check_updates!

Since it took me days to discover the existence of an in-repo, alternative, let me post it here for people trying to do the same.

I’m used to having Icinga and NRPE monitor Ubuntu and Debian update status with check_apt (in repo: nagios-plugins-basic or monitoring-plugins-basic, depending on OS version). Was trying to do the same for yum based CentOS / RHEL but could only find out of repo check_yum.pl and check_yum.py (by Hari Sekhon, at https://github.com/HariSekhon/nagios-plugins/). Those work fine. However it turns out similar functionality is already available in-repository on at least CentOS 6.8 thru 7.2 and, googling around, likely also on Fedora and RHEL . There is a check_updates in package nagios-plugins-check-updates, which also works fine but might be hard to discover because of the name.

OpenVPN client connection not started on Ubuntu 16.04

Ubuntu 16.04 has systemd as its init system. Usually getting an OpenVPN client configuration going, is a matter of dropping the .conf or .ovpn file together with key and certs, into /etc/openvpn. On Ubuntu 16.04, you can ‘service openvpn restart’ all you like, but no connection is being initiated, and the logs stay silent.

Solution:

  1. edit /etc/default/openvpn, uncomment AUTOSTART=”all”
  2. sudo systemctl daemon-reload
  3. sudo service openvpn restart

The comments still say “all” is the default, but that is no longer true in Ubuntu 16.04.

It is also possible to systemd-manage individual server/client configurations, in the style of ‘service openvpn@<my-config> start/stop/status’. See https://fedoraproject.org/wiki/Openvpn#Setting_up_a_Linux_OpenVPN_client.


Issue with Ubuntu 16.04 cross compiler gcc-arm-linux-gnueabihf version 4:5.3.1-1ubuntu1

Adding this here because Google didn’t show very obvious matches for this problem.

I was trying to build a recent u-boot (for olinuxino-lime2), with the Ubuntu 16.04 supplied arm-linux-gnueabihf-as as supplied in package binutils-arm-linux-gnueabihf 2.26-8ubuntu2.1 that was installed as a dependency with apt-get install gcc-arm-linux-gnueabihf 4:5.3.1-1ubuntu1. I then got the following error:

  CC      arch/arm/cpu/armv7/sunxi/psci.o
{standard input}: Assembler messages:
{standard input}:302: Error: push/pop do not support {reglist}^ -- `pop {r0,r1,r2,r3,r4,r9,ip,pc}^'
scripts/Makefile.build:280: recipe for target 'arch/arm/cpu/armv7/sunxi/psci.o' failed
make[2]: *** [arch/arm/cpu/armv7/sunxi/psci.o] Error 1
scripts/Makefile.build:425: recipe for target 'arch/arm/cpu/armv7/sunxi' failed
make[1]: *** [arch/arm/cpu/armv7/sunxi] Error 2
Makefile:1210: recipe for target 'arch/arm/cpu/armv7' failed
make: *** [arch/arm/cpu/armv7] Error 2

This appears out to be due to a bug in gcc, possibly https://gcc.gnu.org/bugzilla/show_bug.cgi?id=70830. I had better luck with Linaro’s https://releases.linaro.org/components/toolchain/binaries/5.3-2016.02/arm-linux-gnueabihf/gcc-linaro-5.3-2016.02-x86_64_arm-linux-gnueabihf.tar.xz as mentioned by Robert Nelson.

GRUB not updating, showing old kernels in boot menu on Ubuntu 14.04

Grub boot problem on Ubuntu 14.04 that people seem to have had for older versions too: the grub boot loader does not get updated with newly installed kernels. Did not find a solution on the net though, so here goes.

Newer kernels get installed but do not show up in the boot menu. A bit puzzling, non of update-grub, grub-install /dev/sda or adding and removing kernel packages made any difference. At boot there was still the same stubborn list of old kernels, and the new ones were not listed.

Turns out somehow grub (v1), Ubuntu package name ‘grub’ had ended up on my system, where the config was grub2 based. So I did apt-get remove grub; apt-get install grub-pc and all was well again, including the latest and greatest kernel in the boot menu.

Kingston memory modules, part number vs revision number

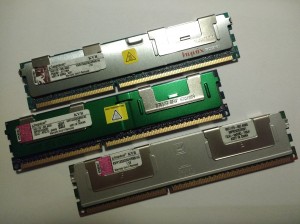
Some Kingston DDR3 DIMMS

Same Kingston Part Number, different Kingston Revision Numbers.

Upgrading memory in some boxes, it turns out that while fairly detailed DMI memory module identification info available through dmidecode on a running Linux system shows a ‘Part Number’ for each memory module:

Handle 0x0015, DMI type 17, 28 bytes
 Memory Device
 Array Handle: 0x000F
 Error Information Handle: Not Provided
 Total Width: 72 bits
 Data Width: 64 bits
 Size: 4096 MB
 Form Factor: DIMM
 Set: None
 Locator: P1-DIMM2A
 Bank Locator: BANK2
 Type: DDR3
 Type Detail: Other
 Speed: 1333 MHz
 Manufacturer: Kingston
 Serial Number: 3C1A27E7
 Asset Tag:
 Part Number: 9965439-121.A00LF
 Rank: Unknown

.. this part number is not always easy to look up, and it is not the same as a Kingston Part Number. On the interwebs, Kingston refers to part numbers like KVR16R11D4/8 or KVR1600D3D4R11S/8G. They have a helpful page about it at www.kingston.com/us/memory/valueram/valueram_decoder that explains what the number means and how to decode it. In Kingston lingo, that is what they mean by ‘Part Number’.

The dmidecode style ‘Part Number’ in Kingston speak, is a ‘Revision Number’. About this they don’t really talk a lot and not all revision numbers are actually mentioned anywhere on the indexed web. You might find them mentioned in data sheets. Kingston  do tell you how to find this revision number, at https://legacy.kingston.com/support/help_master.asp, probably because when there is a reported  issue, internally at Kingston this pinpoints more exactly what product version it is. A Kingston Revision Number looks something like the above, 9965439-121.A00LF. There is also a third number, called the Work Order. That is not very interesting as far as I can tell.

It might help somebody if I write down some Kingston Revision Numbers I encountered and which Kingston Part Number they map to – if you have the physical module, it shows both. There goes:

Kingston Revision Number  Kingston Part Number  More info
9931129-002.A00G          KVR1333D3D4R9S/4G     4GB DDR3 ECC Reg 1.5V DIMM
9931129-004.A00G          KVR1333D3D4R9S/4G     4GB DDR3 ECC Reg 1.5V DIMM
9931129-005.A00G          KVR1333D3D4R9S/4G     4GB DDR3 ECC Reg 1.5V DIMM
9965426-059.A00LF         KVR1333D3D8R9S/4G     4GB DDR3 ECC Reg 1.5V DIMM
9965426-199.A00LF         KVR13LR9D8/8          8GB DDR3L ECC Reg 1.35V DIMM
9965426-405.A00LF         KVR16LR11D8/8HB       8GB DDR3L ECC Reg 1.35V DIMM
9965439-121.A00LF         KVR13LR9S8/4          4GB DDR3L ECC Reg 1.35V DIMM
9965439-127.A00LF         KVR16R11S8/4          4GB DDR3 ECC Reg 1.5V DIMM
9965447-017.A00LF         KVR1333D3D4R9S/4G     4GB DDR3 ECC Reg 1.5V DIMM
9965516-490.A00LF         KVR16R11D4/16         16GB DDR3 ECC Reg 1.5V DIMM
9965600-012.A01G          KVR21R15D4/16HA       16GB DDR4 ECC Reg 1.2V DIMM
9965640-016.A00G          KVR21R15D4/32         32GB DDR4 ECC Reg 1.2V DIMM

Will add more as I come across them.


Linux virtualization with libvirt: NUMA management

Turns out that with any more than lightly loaded modern KVM + libvirt host system that houses more than a single CPU, NUMA tuning is essential.

If you see symptoms like high system CPU time peaks on the host, and steal CPU time on the virtual instances (or ‘missing’ CPU time), chances are the system is spending too much time transferring data between NUMA nodes. Another tell tale sign is guests / VMs that get shot down by the host because of an OOM (Out of Memory) condition, while there seems to be a healthy margin of free/buffered/cached memory.

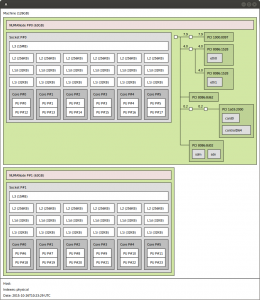
The problem here is that host system memory is distributed across available NUMA nodes. Certain cores are associated to certain nodes. With current x86_64 machines usually one physical processor package, typically containing multiple CPU cores, also holds one NUMA node. It helps performance a lot if a single virtual machine (or any old process) is contained within a single node. The below picture, output of hwloc-ls (apt-get install hwloc) gives an idea of how this is layed out.
hwloc-ls-output

For that reason you might want to pin guests to a defined subset of logical cores, that are all in the same node. The memory assigned to guests within a single NUMA node should also together, fit within the memory the node has available. Having a non NUMA aware guest, even if there is only one, with more memory assigned to it than one NUMA node has available, does not make a lot of sense. There is a big performance penalty because part of the assigned RAM when addressed, always needs to get transferred between nodes. If you need to do this anyway, have a look at e.g. http://docs.openstack.org/developer/nova/testing/libvirt-numa.html – you can make the guest itself NUMA aware so it can efficiently use memory from multiple NUMA cells.

Helpful tools here are numastat -m (apt-get install numactl), the hwloc suite (apt-get install numactl hwloc, see picture, and you will need X forwarding (ssh -X) if you want the graphics from a remote system with hwloc-ls), lscpu.

Peripherals such as disks and NICs are also NUMA node bound, which can be important for DMA performance.

Example numastat output:

root@host-system:~# numastat -m

Per-node system memory usage (in MBs):
                          Node 0          Node 1           Total
                 --------------- --------------- ---------------
MemTotal                64328.18        64510.16       128838.34
MemFree                 10501.73         2769.72        13271.46
MemUsed                 53826.45        61740.43       115566.88
Active                  48528.07        55331.48       103859.55
Inactive                 3082.79         4013.75         7096.54
Active(anon)            45496.47        51762.40        97258.87
Inactive(anon)              0.12            0.18            0.30
Active(file)             3031.60         3569.08         6600.68
Inactive(file)           3082.67         4013.56         7096.23
Unevictable                 0.00            0.00            0.00
Mlocked                     0.00            0.00            0.00
Dirty                       0.50            0.30            0.80
Writeback                   0.00            0.00            0.00
FilePages                6115.00         7584.15        13699.15
Mapped                     13.54            6.84           20.38
AnonPages               45495.84        51761.65        97257.49
Shmem                       0.73            0.94            1.67
KernelStack                 6.70            4.98           11.69
PageTables                 94.40          124.43          218.82
NFS_Unstable                0.00            0.00            0.00
Bounce                      0.00            0.00            0.00
WritebackTmp                0.00            0.00            0.00
Slab                     1462.05         1622.14         3084.19
SReclaimable              701.69         1071.01         1772.70
SUnreclaim                760.36          551.12         1311.49
AnonHugePages            1396.00          438.00         1834.00
HugePages_Total             0.00            0.00            0.00
HugePages_Free              0.00            0.00            0.00
HugePages_Surp              0.00            0.00            0.00

From virsh capabilities, example NUMA layout:

    <topology>
      <cells num='2'>
        <cell id='0'>
          <memory unit='KiB'>65872056</memory>
          <cpus num='12'>
            <cpu id='0' socket_id='0' core_id='0' siblings='0,12'/>
            <cpu id='1' socket_id='0' core_id='1' siblings='1,13'/>
            <cpu id='2' socket_id='0' core_id='2' siblings='2,14'/>
            <cpu id='3' socket_id='0' core_id='3' siblings='3,15'/>
            <cpu id='4' socket_id='0' core_id='4' siblings='4,16'/>
            <cpu id='5' socket_id='0' core_id='5' siblings='5,17'/>
            <cpu id='12' socket_id='0' core_id='0' siblings='0,12'/>
            <cpu id='13' socket_id='0' core_id='1' siblings='1,13'/>
            <cpu id='14' socket_id='0' core_id='2' siblings='2,14'/>
            <cpu id='15' socket_id='0' core_id='3' siblings='3,15'/>
            <cpu id='16' socket_id='0' core_id='4' siblings='4,16'/>
            <cpu id='17' socket_id='0' core_id='5' siblings='5,17'/>
          </cpus>
        </cell>
        <cell id='1'>
          <memory unit='KiB'>66058400</memory>
          <cpus num='12'>
            <cpu id='6' socket_id='1' core_id='0' siblings='6,18'/>
            <cpu id='7' socket_id='1' core_id='1' siblings='7,19'/>
            <cpu id='8' socket_id='1' core_id='2' siblings='8,20'/>
            <cpu id='9' socket_id='1' core_id='3' siblings='9,21'/>
            <cpu id='10' socket_id='1' core_id='4' siblings='10,22'/>
            <cpu id='11' socket_id='1' core_id='5' siblings='11,23'/>
            <cpu id='18' socket_id='1' core_id='0' siblings='6,18'/>
            <cpu id='19' socket_id='1' core_id='1' siblings='7,19'/>
            <cpu id='20' socket_id='1' core_id='2' siblings='8,20'/>
            <cpu id='21' socket_id='1' core_id='3' siblings='9,21'/>
            <cpu id='22' socket_id='1' core_id='4' siblings='10,22'/>
            <cpu id='23' socket_id='1' core_id='5' siblings='11,23'/>
          </cpus>
        </cell>
      </cells>
    </topology>

Example (virsh edit instance) instance CPU/memory definition for the above layout:

  <memory unit='KiB'>16777216</memory>
  <currentMemory unit='KiB'>16777216</currentMemory>
  <vcpu placement='static' cpuset='8-9,20-21'>4</vcpu>

The logical CPUs in the cpuset are all within one NUMA node (cell with id 1) and the memory fits within the 64GB available to that node.

Ubuntu Server 14.04 installation: CD could not be mounted

This happens a lot when trying to install Ubuntu Server 14.04 from USB stick (14.04.3 still has the issue).

[!! Detect and mount CD-ROM]
Your installation CD-ROM couldn't be mounted. This probably means that the CD-ROM was not in the drive. If so you can insert it and try again.
Retry mounting the CD-ROM?

.. and of course there is no CD-ROM at all, the installation media are on the USB drive. An easy way to work around this:

  1. Open a second console with Alt-F2 (get back to the installation dialogue with Alt-F1 later)
  2. Press enter to activate it
  3. Enter the following command to make /cdrom a softlink to /media:

    rmdir /cdrom; ln -s media /cdrom

  4. Go back to the installation process with Alt-F1
  5. Answer ‘yes’ to the question Retry mounting the CD-ROM?

From here on the installation should go on as normal.